To connect your API Integrations with your AI Agent’s dialog flow, you need to use Integration Modules inside your dialog flow builder. The integration is triggered the moment this module is reached in the dialog flow (where you placed and connected your integration module).
This article assumes basic knowledge of building Dialogs Flows and at least one endpoint configured in the API Integrations section.
Integration Types: Blocking vs Async
There are two types of integration modules, and choosing the right one depends on how fast your API responds and the type of bot you’re building.
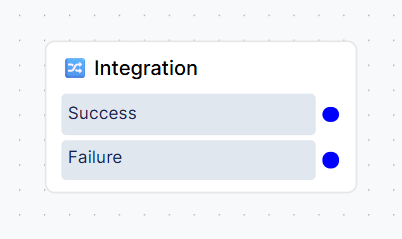
API Integration Module
This module waits for the response before continuing.
-
Ideal for: Chatbots, Emailbots, or fast APIs
-
The dialog stops here until the response is received or a timeout occurs
-
After that, the flow continues through either the Success or Failure output port
Avoid using this module with slow APIs in voicebots. Long delays can disrupt the call flow and customer experience. Use the Async/Await version of the module instead.
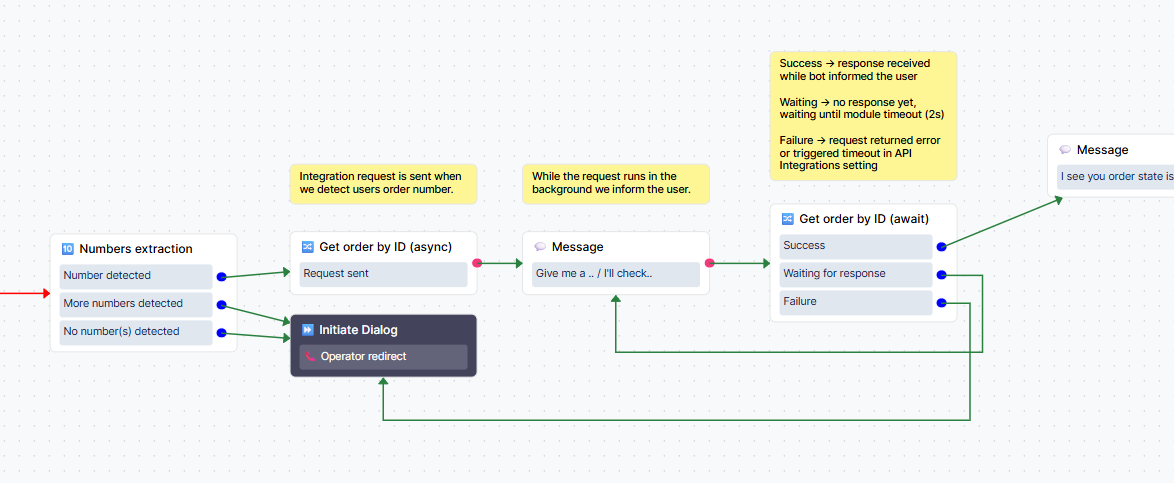
API Integration (Async + Await) Module
This method is non-blocking. It separates sending the request and checking the result into two separate modules that you need to use and link together:
-
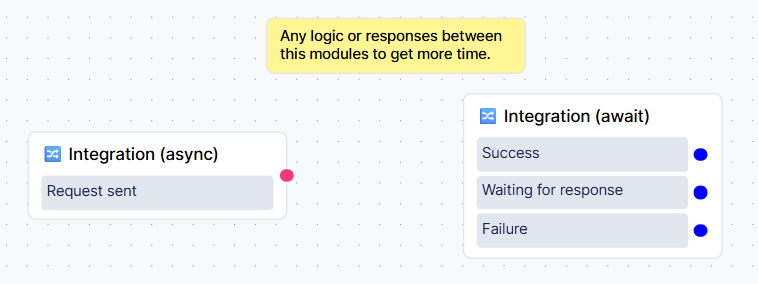
API Integration (Async) — sends the request and immediately moves to the next connected module in your dialog flow without waiting for the response (the mapped
$contexts are not created yet) -
API Integration (Await) — later checks if the response has arrived. If not, it waits for a specified time and then continues through the appropriate output port.
-
Usually only used for Voicebots
-
Lets you keep the conversation going while the integration runs in the background (in the meantime, the bot is asking other questions or just informs the user that we’re working on it)
-
The Await module waits for the response when the dialog flow reaches this module. If the result still isn’t ready, it pauses for the defined timeout period, and then continues through the Waiting for response path if the response is still not received. You can loop the dialog back to this module to retry or choose a fallback dialog instead.
How to Use the Integration Modules
Using the Basic “API Integration” Module
-
In the Advanced section of the module panel, drag the API Integration module into your flow.
-
Click the module to open the settings panel.
-
From the dropdown, choose the endpoint you want to use.
-
Optionally add custom dynamic output ports (if you defined them in API Integrations management)
-
Connect the Success and Failure outputs (and custom ports, if any) to define what happens next.
Using the Async Version
Step 1: API Integration (Async)
-
Place the API Integration (Async) module into your flow.
-
Select the endpoint to call.
-
Connect the next steps — this happens immediately
-
Note: Any input
$contextneeded for the integration must exist at this point — the bot needs them to send the request
Step 2: API Integration (Await)
-
Use the Await module further in the flow, where you want to check if the response has arrived and assume enough time has passed to receive it.
-
Set the module timeout (how long the bot should wait for the response if it hasn’t been received yet). Note that the timeout set for this endpoint in API Integrations management is still enforced (to prevent infinite loops), so make sure the module timeout is not longer than the endpoint timeout.
-
Connect:
-
Success → response is ready, mapped contexts can be used
-
Waiting for response → response not ready in time (you can try again but make sure not to create an infinite loop — use the Counter Module to divert repeated timeouts)
-
Failure → error occurred
-
-
Note: There must be a red arrow or another type of pause between the Async and Await modules. The bot processes all modules linked with green arrows simultaneously, so without a pause, it wouldn’t have enough time to receive the response.